https://airflow.apache.org/docs/apache-airflow/stable/tutorial.html
Tutorial — Airflow Documentation
airflow.apache.org
Airflow Tutorial documentaion을 부숴보자
참고로 작성당시 Airflow 버전은 2.1.2이다.
from datetime import timedelta
from textwrap import dedent

# The DAG object; we'll need this to instantiate a DAG
from airflow import DAG

# Operators; we need this to operate!
from airflow.operators.bash import BashOperator
from airflow.utils.dates import days_ago
# These args will get passed on to each operator
# You can override them on a per-task basis during operator initialization
default_args = {
    'owner': 'airflow',
    'depends_on_past': False,
    'email': ['airflow@example.com'],
    'email_on_failure': False,
    'email_on_retry': False,
    'retries': 1,
    'retry_delay': timedelta(minutes=5),
    # 'queue': 'bash_queue',
    # 'pool': 'backfill',
    # 'priority_weight': 10,
    # 'end_date': datetime(2016, 1, 1),
    # 'wait_for_downstream': False,
    # 'dag': dag,
    # 'sla': timedelta(hours=2),
    # 'execution_timeout': timedelta(seconds=300),
    # 'on_failure_callback': some_function,
    # 'on_success_callback': some_other_function,
    # 'on_retry_callback': another_function,
    # 'sla_miss_callback': yet_another_function,
    # 'trigger_rule': 'all_success'
}
with DAG(
    'tutorial',
    default_args=default_args,
    description='A simple tutorial DAG',
    schedule_interval=timedelta(days=1),
    start_date=days_ago(2),
    tags=['example'],
) as dag:
# t1, t2 and t3 are examples of tasks created by instantiating operators
t1 = BashOperator(
task_id='print_date',
bash_command='date',
)
t2 = BashOperator(
task_id='sleep',
depends_on_past=False,
bash_command='sleep 5',
retries=3,
)
t1.doc_md = dedent(
"""\
#### Task Documentation
You can document your task using the attributes `doc_md` (markdown),
`doc` (plain text), `doc_rst`, `doc_json`, `doc_yaml` which gets
rendered in the UI's Task Instance Details page.

"""
)
dag.doc_md = __doc__ # providing that you have a docstring at the beggining of the DAG
dag.doc_md = """
This is a documentation placed anywhere
""" # otherwise, type it like this
templated_command = dedent(
"""
{% for i in range(5) %}
echo "{{ ds }}"
echo "{{ macros.ds_add(ds, 7)}}"
echo "{{ params.my_param }}"
{% endfor %}
"""
)
t3 = BashOperator(
task_id='templated',
depends_on_past=False,
bash_command=templated_command,
params={'my_param': 'Parameter I passed in'},
)
t1 >> [t2, t3]Airflow에서 제공하는 airflow/example_dags/tutorial.py 전체 코드이다.
이 python 스크립트는 DAG의 구조를 지정하는 구성 파일이고, 실제 정의된 작업은 다른 스크립트에서 실행된다.
각각의 task이 다른 workers에 의해 다른 시간대의 포인트에서 실행되고, 이는 각각의 task들이 서로 communicate를 할 수 없다는 뜻과 같다.
이를 가능하게 하기 위해선 XComs(https://airflow.apache.org/docs/apache-airflow/stable/concepts/xcoms.html)가 필요하다. 추후에 다뤄보도록 하자.
XComs — Airflow Documentation
airflow.apache.org
나 같은 Airflow 초보자들은 위와 같은 DAG definition file이 실제로 어떠한 Data processing이 가능하다고 생각하는데,
이는 그렇지 않다. DAG python script 의 목적은 DAG object를 정의하는 것일 뿐.
이제 세부적으로 코드를 살펴보자.
Importing Modules
from datetime import timedelta
from textwrap import dedent
# The DAG object; we'll need this to instantiate a DAG
from airflow import DAG
# Operators; we need this to operate!
from airflow.operators.bash import BashOperator
from airflow.utils.dates import days_agoDAG를 정의하는데 필요한 Modules을 import 하는 코드다.
Airflow Module
- DAG - dag를 정의하기 위함
- operators - 실제 연산(실행)을 하기 위해 필요한 operators들을 불러오기 위함
python과 airflow가 어떻게 module을 다루는지 아래 url에서 확인할 수 있다.
추후에 다뤄보도록 하자.
(https://airflow.apache.org/docs/apache-airflow/stable/modules_management.html)
Modules Management — Airflow Documentation
airflow.apache.org
Default Arguments
# These args will get passed on to each operator
# You can override them on a per-task basis during operator initialization
default_args = {
'owner': 'airflow',
'depends_on_past': False,
'email': ['airflow@example.com'],
'email_on_failure': False,
'email_on_retry': False,
'retries': 1,
'retry_delay': timedelta(minutes=5),
# 'queue': 'bash_queue',
# 'pool': 'backfill',
# 'priority_weight': 10,
# 'end_date': datetime(2016, 1, 1),
# 'wait_for_downstream': False,
# 'dag': dag,
# 'sla': timedelta(hours=2),
# 'execution_timeout': timedelta(seconds=300),
# 'on_failure_callback': some_function,
# 'on_success_callback': some_other_function,
# 'on_retry_callback': another_function,
# 'sla_miss_callback': yet_another_function,
# 'trigger_rule': 'all_success'
}DAG를 만들거나 다른 task들을 만들 때, default로 제공하는 파라미터의 집합인 default_args를 선언하는 코드이다.
물론 default이기 때문에, 나중에 operator를 선언할 때 변경 가능하다.
주석 처리된 부분 이외의 파라미터를 알아보자.
- owner (str) - 해당 task의 소유자이다, unix 사용자 이름을 사용하는 것을 추천함.(아마 airflow내의 계정 이름이거나, 실제 unix(linux) username을 말하는 것 같음.)
- depends_on_past (bool) - true 일 경우, task instance가 순차적으로 실행된다(이전 task instance가 성공했거나, 건너뛴 경우에만 실행) start_date에 대한 task instance 실행이 허용됨.
- email (str or list[str]) - email 알람을 받는 메일 주소 , 하나 혹은 여러 메일 주소를 입력 가능하다. 여러 메일인 경우, comma 나 semi-colon을 통해 분리해줘야 함.
- email_on_failure (bool) - task가 실패할 경우 메일을 보내는 여부
- email_on_retry (bool) - task가 재시도 될 경우 메일을 보내는 여부
- retries (int) - task가 실패할 경우 재시도하는 횟수
- retry_delay (datetime.timedelta) - 재시도 사이의 delay 시간
이외에 BaseOperator의 parameter가 실제로 하는 역할은 아래 url을 통해 확인할 수 있다.
추후에 다뤄보도록 하자.
airflow.models — Airflow Documentation
airflow.apache.org
Instantiate a DAG
with DAG(
'tutorial',
default_args=default_args,
description='A simple tutorial DAG',
schedule_interval=timedelta(days=1),
start_date=days_ago(2),
tags=['example'],
) as dag:task를 DAG에 넣기 위해 DAG를 선언한다.
DAG?
A dag (directed acyclic graph) is a collection of tasks with directional dependencies. A dag also has a schedule, a start date and an end date (optional). For each schedule, (say daily or hourly), the DAG needs to run each individual tasks as their dependencies are met. Certain tasks have the property of depending on their own past, meaning that they can’t run until their previous schedule (and upstream tasks) are completed.
DAGs essentially act as namespaces for tasks. A task_id can only be added once to a DAG.
1. 방향이 있다.
2. 비순환 그래프이다.
3. 방향성이 있는 작업의 모음이다.
4. 예약, 시작날짜 및 종료날짜(선택사항)가 있다.
5. 짜여진 스케쥴이 충족 될 때 실행한다.
처음 'tutorial'은 dag_id 를 의미하고 이는 DAG의 unique identifier이다.
또한 위에서 선언해 주었던 default_args를 그대로 집어넣는다.
추가로 schedule_interval을 parameter를 추가해 줬다.
위 코드에 나와 있는 DAG class의 Parameter를 알아보자.
- dag_id (str) - DAG의 id다. ASCII에 있는 영어, 숫자, 대시, 점, 밑줄로만 구성되야 함.
- default_args (dict) - default 파라미터 변수 dict
- description (str) - airflow 웹 서버에서 보여지는 내용
- schedule_interval (datetime.timedelta or dateutil.relativedelta.relativedelta or str that acts as a cron expression) - 얼마나 자주 DAG를 run 할지 정하는 것이다. 스케쥴을 파악하기 위해서 timedelta 객체가 task instance의 execution_date에 추가된다.
- start_date (datetime.datetime) - 스케쥴러가 backfill(?)을 시도하는 것 (아마 스케쥴러가 DAG를 실행 queue에 집어 넣는 것을 말하는 것 같다.)
- tags: Optional[List[str]] = None)


DAG 선언할 때 description파라미터값으로 넣었던 'A simple tutorial DAG' 를 확인할 수 있다.
Tasks
# 코드 상단에 있는 default_args
'''
default_args = {
    'owner': 'airflow',
    'depends_on_past': False,
    'email': ['airflow@example.com'],
    'email_on_failure': False,
    'email_on_retry': False,
    'retries': 1,
    'retry_delay': timedelta(minutes=5),
'''

t1 = BashOperator(
    task_id='print_date',
    bash_command='date',
)

t2 = BashOperator(
    task_id='sleep',
    depends_on_past=False,
    bash_command='sleep 5',
    retries=3,
)
Task는 operator를 인스턴스화 할때 생성된다. 인스턴스화 된 연산자를 Task라고 부른다. task id는 task의 unique identifier이다.
BashOperator를 인스턴스화 할 때 받는 다양한 argument가 있을 수 있다.
첫 번째 task(t1) 같은 경우엔, 처음 보는 specific argument인 bash_command가 있고
두 번째 task(t2) 같은 경우엔, default_args에서 선언했던 retries를 operator's constructor에서 상속받아 3으로 오버라이드한다.
Task에 대한 우선순위 룰은 다음과 같다:
1. 명시적으로 전달된 arguments
2. default_args dictionary에 있는 값
3. 해당하는 operator에 있는 default value
task에서는 반드시 task_id 와 owner 가 전달되어야 한다. 그렇지 않으면 exception error 가 발생한다.
Templating with Jinja
https://jinja.palletsprojects.com/en/2.11.x/
Jinja — Jinja Documentation (3.0.x)
jinja.palletsprojects.com
Airflow에서는 Jinja 라는 template의 장점을 활용하고 pipeline 작성자에게 기본 제공되는 매개변수 및 매크로 집합을 제공한다. 또한 그들 자체의 own parameters와 macros 그리고 templates을 제공한다.
templated_command = dedent(
    """
{% for i in range(5) %}
    echo "{{ ds }}"
    echo "{{ macros.ds_add(ds, 7)}}"
    echo "{{ params.my_param }}"
{% endfor %}
"""
)

t3 = BashOperator(
    task_id='templated',
    depends_on_past=False,
    bash_command=templated_command,
    params={'my_param': 'Parameter I passed in'},
)
하나하나 따져보자.
templated_command 변수에
1. {% %}의 블록 형태로 감싸진 것이 있다.
2. {{ ds }}의 형태가 있는데, 이는 (today’s “date stamp”)를 의미한다.
3. {{ macros.ds_add(ds, 7)}} macros라는 function을 불러온 것이다.
4. {{ params.my_param }} 이는 user가 직접 정의한 parameter이다.
BaseOperator 에서는 params 라는 파라미터 hook을 사용하여 파라미터 혹은 객체의 dictionary를 템플릿에 전달할 수 있다.
위의 템플릿에서는 params.my_param으로 params parameter hook을 사용했다.
bash_command 에는 bash script file을 보낼 수 있는데, 예를 들어 bash_command='templated_command.sh' 도 가능하다. sh 파일의 경로는 기본적으로 현재 python script가 쓰여지는 곳으로 설정된다. template_searchpath 를 통해 경로 변경이 가능하다.
또한 user_defined_macros 를 선언해서 사용할 수 있다. 예를 들어 dict(foo='bar') 를 argument로 넘기면, {{ foo }} 로 템플릿에서 사용 가능하다. 게다가 user_defined_filters 를 사용하면 dict(hello=lambda name: 'Hello %s' % name) 로 선언해서 {{ 'world' | hello }} 이와같이 hello 함수를 world라는 argument를 넘기며 사용 할 수 있다.
하여간 다양한 확장성과 유연함이 돋보인다. 나중에 잘 활용할 수 있게 해봐야겠다.
Adding DAG and Tasks documentation
t1.doc_md = dedent(
"""\
#### Task Documentation
You can document your task using the attributes `doc_md` (markdown),
`doc` (plain text), `doc_rst`, `doc_json`, `doc_yaml` which gets
rendered in the UI's Task Instance Details page.

"""
)
dag.doc_md = __doc__ # providing that you have a docstring at the beggining of the DAG
dag.doc_md = """
This is a documentation placed anywhere
""" # otherwise, type it like thisDAG와 Task에 documentation을 만들 수 있다. DAG는 markdown 언어만 지원하고 Task 는 plain text, markdown, reStructuredText, json, yaml 등을 지원한다.
초반엔 많이 쓸 일이 없을 것 같다.
Airflow에서 DAG 시작을 doc string기반 documentation 으로 작성하는 것을 추천한다. 혹은 파일 어느 곳에서도 작성 가능하다.
그럼 실제로 위 코드 에서 작성 된 documentation을 찾아보자.
terminal을 열고, ubuntu를 열고 docker가 설치 된 디렉토리로 이동하자.
혹시 airflow 및 docker를 설치하지 않았다면 하단 포스팅을 참고해서 설치해도 좋다.
2021.08.19 - [Data Engineering/Airflow] - #1 Airflow 설치 (With Docker windows)
#1 Airflow 설치 (With Docker windows)
회사에서 Airflow를 도입하게 되면서, 나도 제대로 정리할 겸 블로그에 시리즈 방식으로 정리할 계획이다. Airflow documentation을 읽고 Docker 기반으로 Airflow를 설치했다. https://airflow.apache.org/docs/a..
hkim-data.tistory.com

docker container가 활성화 되어 있지 않다면
하단 명령어를 입력하자.
docker-compose up
잘 실행이 되면, docker ps 명령어를 통해 확인 해 보자.

자 이제 웹 사이트에 http://localhost:8080/ 를 입력하자.
참고로 2.1.2 기준 default username password는 airflow/airflow이다
스크롤을 내리면 tutorial을 확인 할 수 있다.


# tutorial.py 일부
	t1 = BashOperator(
        task_id='print_date',
        bash_command='date',
    )

    t2 = BashOperator(
        task_id='sleep',
        depends_on_past=False,
        bash_command='sleep 5',
        retries=3,
    )
    t3 = BashOperator(
        task_id='templated',
        depends_on_past=False,
        bash_command=templated_command,
        params={'my_param': 'Parameter I passed in'},
    )
    t1 >> [t2, t3]
우리가 선언한 3개의 operator의 코드를 가져왔다.
t1, t2, t3 모두 bash command를 실행하는 BashOperator 이고,
각각의 task_id는 print_date, sleep, templated를 확인할 수 있다.
t1 실행 이후 t2, t3가 실행되는 dependency를 지정해 줬다. (좀 있다 아래에서 설명할 예정이다.)
Graph View를 클릭하면 tutorial.py 에서 선언한 operator들이 보인다.
실제로 하단 web ui에서 task_id와 설정한 dependency 그대로 설정 되어 있는 것을 확인 할 수 있다.
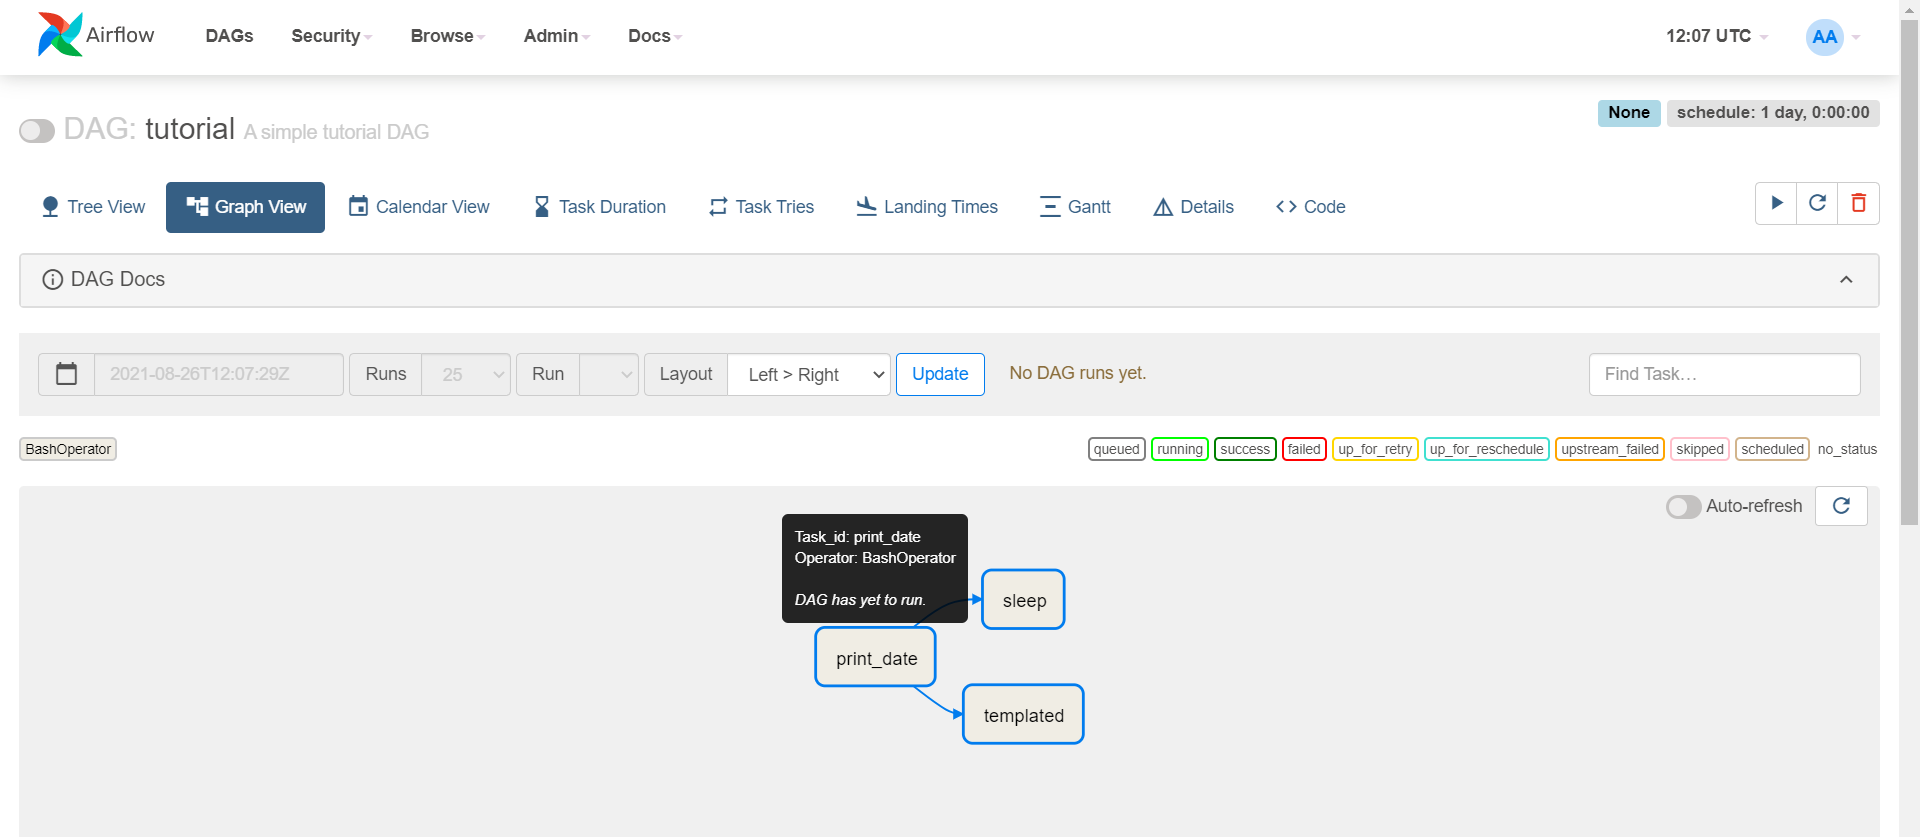
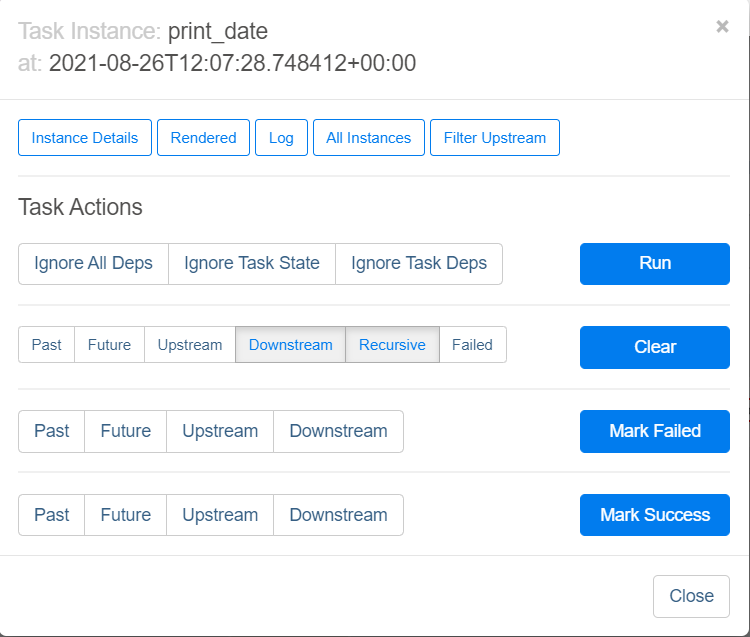
간단하게 확인해 봤으니 operator documentation을 확인 해 보자. print_date를 클릭해보자

Setting up Dependencies
주관적으로 생각하는 Airflow의 꽃 Dependency를 정의하는 곳이다.
tutorials.py 하단에 아래와 같이 설정되어 있다.
t1 >> [t2, t3]
이는 t1 작업이 끝나면 t2, t3 를 시작하라는 뜻과 같다.
python 에서는 >> 이런 표시를 비트연산을 쓰지만, airflow에서는 이를 dependency를 정의하는데에 쓴다.
t1.set_downstream(t2)

# This means that t2 will depend on t1
# running successfully to run.
# It is equivalent to:
t2.set_upstream(t1)

# The bit shift operator can also be
# used to chain operations:
t1 >> t2

# And the upstream dependency with the
# bit shift operator:
t2 << t1

# Chaining multiple dependencies becomes
# concise with the bit shift operator:
t1 >> t2 >> t3

# A list of tasks can also be set as
# dependencies. These operations
# all have the same effect:
t1.set_downstream([t2, t3])
t1 >> [t2, t3]
[t2, t3] << t1
맨 위부터 살펴보자.
t1.set_downstream(t2)
- t1의 downstream을 t2라고 하겠다 라는 뜻인데 t1다음에 t2 실행하라는 뜻
t2.set_upstream(t1)
- t2의 upstream을 t1으로 하겠다 라는 뜻인데 t2 앞에 t1 실행하라는 뜻 (위와 하는 일이 동일)
t1 >> t2
- t1 다음 t2 실행 하라는 뜻 ( 직관적이고 쓰기도 보기도 좋다. 난 이 방법만 쓴다.)
t2 << t1
- t2 전에 t1 실행 하라는 뜻 (위와 하는 일이 동일)
t1 >> t2 >> t3
- t1 실행 이후 t2 실행 이후 t3 실행
t1.set_downstream([t2, t3])
t1 >> [t2, t3]
[t2, t3] << t1
- 모두 같은 뜻으로 t1 실행 이후 t2, t3 실행 하라는 뜻
듀토리얼 마지막에 Backfill 의 개념이 나오는데
이는 첫 실행 시간을 과거로 설정할 때, 과거 시간 부터 현재까지 실행되었어야 하는 DAG를 모두 실행시키는 것이다.
이렇게 하기 싫으면 DAG 선언 시 catchUp=False로 설정 해 두면 된다.
솔직히 tutorials.py 한번 보고 전혀 이해가 안가서 몇 번씩 documentaion 보고서야 그나마 조금 알 것 같았다.
다음 포스팅에는 Airflow Concepts 을 하나씩 파헤쳐 보는 시간을 가져볼까 한다.
'Data Engineer > Airflow' 카테고리의 다른 글
| #3 Airflow Concepts documentation 부수기 [Architecture] (0) | 2021.08.28 |
|---|---|
| #1 Airflow 설치 (With Docker windows) (8) | 2021.08.19 |


댓글